고정 헤더 영역
상세 컨텐츠
본문
안녕하세요?
오늘은 1편(Preprocessing Text Data)에 이은 Text Data Exploration (품사별 토큰 추출, 토큰 빈도 시각화, 유사단어 & 연어) 단계를 복습해보려고 합니다.
The process of data analysis for text data
- 텍스트 데이터를 str 자료형으로 준비
- Preprocessing Text Data
- Tokenizing (토큰화)
- POS tagging (품사 판별)
- Stopwords 제거 (불용어 제거)
- Lemmatize (단어 어근 찾기)
- Text Data Exploration
- 품사별 토큰 추출
- 토큰별 등장횟수 시각화
- 특정 단어와 유사한 단어 찾기
- 연달아 등장하는 단어짝 찾기
- Text Similarity Analysis
- TF-IDF
- Cosine Similarity
- 영화 리뷰 간 유사도 계산
오늘 활용해볼 데이터는 영화 Dark Night의 영문 리뷰들을 모아둔 텍스트 데이터 입니다.
오늘 해볼 것
- 리뷰에 가장 많이 등장했던 단어 추출
- 토큰의 등장 횟수 시각화 (정규표현식 이용)
- 문맥상 유사한 단어 추출
- 연어 (collocation) 추출
우선 오늘 해볼 것들에 쓰일 nltk 라이버러리를 불러오고 시작해보도록 하겠습니다.
!pip install nltk==3.6.1
import nltk
nltk.download('punkt')
nltk.download('stopwords')
nltk.download('wordnet')
nltk.download('averaged_perceptron_tagger')
nltk.download('maxnet_treebank_pos_tagger')
from nltk.corpus import stopwords
from collections import Counter
1. Dark Night 리뷰에 가장 많이 등장한 단어 추출
1) 가장 많이 등장한 명사 추출
# 1) Stopwords 준비
stop_words = stopwords.words("english")
stop_words.append(',')
stop_words.append('.')
stop_words.append('’')
stop_words.append('”')
stop_words.append('—')

# 2) Text data 준비
file = open('darkknight.txt', 'r', encoding="utf-8")
lines = file.readlines()  # readlines 함수로 텍스트 파일의 내용을 읽어 리스트로 저장(한줄씩)

# 3) Tokenizing
tokens = []
for line in lines :
  tokenized = nltk.word_tokenize(line)
  for token in tokenized :
    if token.lower() not in stop_words :
      tokens.append(token)

# 4) POS Tagging - 명사 종류만 모으기
wordList = []
tags = nltk.pos_tag(tokens)
for word, tag in tags :
  if tag.startswith('N') : # or if tag in ['NN', 'NNS', 'NNP', 'NNPS']
    wordList.append(word.lower())

# 5) 추출된 각 명사의 숫자 세고 가장 많이 등장한 10개 명사 출력
counts = Counter(wordList)
print(counts.most_common(10))
전반적인 단계는 1편에서 해보았던 단계들이기 때문에 자세한 설명은 생략하고 마지막에 Counter 라이브러리를 활용한 것을 봐주시길 바라며,
코드를 실행해보시면 리뷰에 가장 많이 쓰였던 명사 10개가 잘 출력되는 것을 보실 수 있습니다.
[('movie', 406), ('batman', 303), ('film', 284), ('joker', 219), ('dark', 136), ('ledger', 131), ('knight', 124), ('time', 112), ('heath', 110), ('performance', 87)]
2) 같은 방식으로 형용사와 동사 적용이 가능합니다.
# 초반 1,2,3 단계 생략

# 형용사적용
wordList = []
tags = nltk.pos_tag(tokens)
for word, tag in tags :
  if tag.startswith('J') : # or if tag in ['JJ', 'JJR', 'JS']
    wordList.append(word.lower())

counts = Counter(wordList)
print(counts.most_common(10))

# 동사사적용
wordList = []
tags = nltk.pos_tag(tokens)
for word, tag in tags :
  if tag.startswith('V') : # or if tag in ['VB', 'VBD', 'VBN', 'VBP', 'VBZ']
    wordList.append(word.lower())

counts = Counter(wordList)
print(counts.most_common(10))
3) 그렇다면 리뷰에 등장하는 모든 토큰의 개수가 얼마나 되는지 출력해볼까요?
# 영화 dark night 리뷰에 등장하는 토큰 개수 확인하기

# 1) Stopwords 준비
stop_words = stopwords.words("english")
stop_words.append(',')
stop_words.append('.')
stop_words.append('’')
stop_words.append('”')
stop_words.append('—')
stop_words.append('else')
stop_words.append('$')

# 2) Text data 준비
file = open('darkknight.txt', 'r', encoding="utf-8")
lines = file.readlines()

# 3) Tokenizing
tokens = []
for line in lines :
  tokenized = nltk.word_tokenize(line)
  for token in tokenized :
    if token.lower() not in stop_words :
      tokens.append(token)

# 4) 리뷰에 등장하는 모든 토큰 개수 출력
corpus = nltk.Text(tokens) # type(corpus) -> 새로운 형태의 데이터타입, 나중에 텍스트 데이터 분석 활동 시 다른 많은 기능 제공
print(len(corpus.tokens))  # 전체 token의 개수를 출력
print(len(set(corpus.tokens)))  # unique한 token의 개수를 출력
· corpus = nltk.Text(tokens) 부분을 주의깊게 봐주시기 바랍니다. (nltk를 활용할 때 많은 것을 해볼 수 있으며 밑에서 활용해볼 예정)
실행해보시면 전체토큰의 개수는 18465개, 중복된 걸 지우고도 unique한 토큰의 개수는 4635개인 것을 확인해볼 수 있습니다.
그런데 지금 stopwords에 굉장히 많은 불용어들을 추가해서 지워주었음에도 불구하고,
실제로 corpus.tokens를 확인해보면 굉장히 많은 특수문자들이 토큰형태로 저장되어있음을 확인해볼 수 있습니다.
이렇게 많은 특수문자들을 일일이 확인하며 계속 불용어에 추가해 지우고를 반복할 수는 없을 것입니다.
어떻게 하면 이 많은 특수문자들을 간단히 없앨 수 있을까요?
이때 활용되는 것이 바로 정규표현식입니다.
(정규표현식에 대한 이해와 예제 코드는 2편을 참고해주시기 바랍니다.)
2. 토큰의 등장 횟수 시각화
토큰의 등장 횟수를 시각화하기 전, 토큰의 리스트를 만들 때 정규표현식을 이용하여 특수문자들은 다 빠지도록 하겠습니다.
import matplotlib.pyplot as plt
import re # 정규표현식

stop_words = stopwords.words("english")
stop_words.append('else')

file = open('darkknight.txt', 'r', encoding="utf-8")
lines = file.readlines()

tokens = []

for line in lines:
    tokenized = nltk.word_tokenize(line)

    for token in tokenized: # 각 Token이

        if token.lower() not in stop_words: # Stopwords 리스트에 포함되어 있지 않으며,

            if re.match('^[a-zA-Z]+', token): # 특수 기호에 해당하지 않을 경우

                tokens.append(token) # Token list 에 추가해준다.

corpus = nltk.Text(tokens)
# corpus.tokens 확인 -> 특수기호가 다 빠져있음.!

plt.figure(figsize=(10, 3))
plt.title('Top 25 Words',fontsize=30)

corpus.plot(25) # 상위 25개까지만 확인, "plot" the data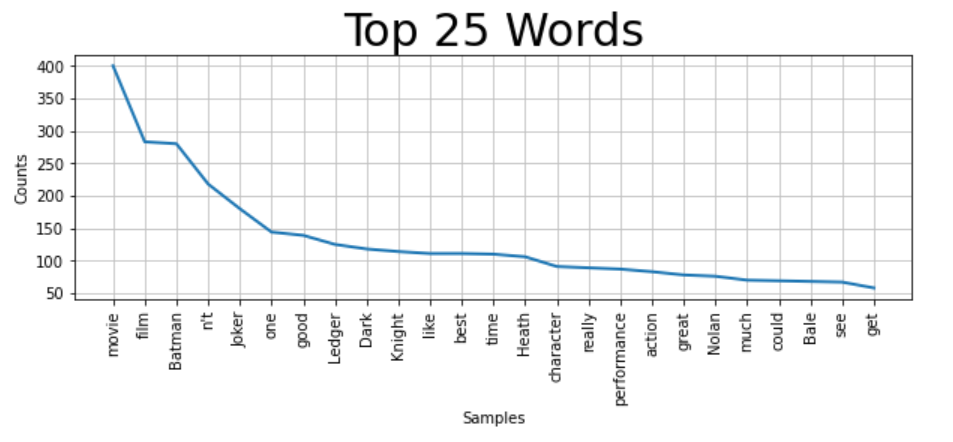
3. 문맥상 유사한 단어 추출
1 에서 아주 잠깐 얘기 했듯이 ' corpus = nltk.Text(tokens) '를 이용해 토큰들을 ' nltk.text.Text '의 데이터 타입 형태로 만들면 2에서 본 것처럼 바로 시각화에 적용도 할 수도 있고 그 외 다른 많은 것들을 해볼 수 있습니다.
지금은 한 단어를 쥐어주고 리뷰안에서 그 단어와 문맥상으로 비슷한 단어들은 무엇이 있는지 확인해보고
그 다음으로는 이 리뷰의 연어 (collocation)는 무엇인지 확인해보고 마무리하겠습니다.
file = open('darkknight.txt', 'r', encoding="utf-8")
lines = file.readlines()

tokens = []

for line in lines:
    tokenized = nltk.word_tokenize(line)
    for token in tokenized: # 각 Token이
        if token.lower() not in stop_words: # Stopwords 리스트에 포함되어 있지 않으며,
            if re.match('^[a-zA-Z]+', token): # 특수 기호에 해당하지 않을 경우,
                tokens.append(token) # Token list 에 추가해준다.

corpus = nltk.Text(tokens)

print('Similar words : ')
corpus.similar('batman') # 유사한 단어들 (similar words)
Similar words :
superhero film action movie character better iconic seen acting actor
heath performance modern difficult villain second end good come best리뷰안에서 batman과 문맥상으로 유사한 단어들이 잘 추출해낸 것을 확인할 수 있습니다.
4. 텍스트의 연어 (collocation) 출력
file = open('darkknight.txt', 'r', encoding="utf-8")
lines = file.readlines()

tokens = []

for line in lines:
    tokenized = nltk.word_tokenize(line)
    for token in tokenized: # 각 Token이
        if token.lower() not in stop_words: # Stopwords 리스트에 포함되어 있지 않으며,
            if re.match('^[a-zA-Z]+', token): # 특수 기호에 해당하지 않을 경우,
                tokens.append(token) # Token list 에 추가해준다.

corpus = nltk.Text(tokens)

print('Collocation')
corpus.collocations() # co-location
Collocation
Dark Knight; Heath Ledger; Christian Bale; comic book; Harvey Dent;
Christopher Nolan; Bruce Wayne; Aaron Eckhart; Morgan Freeman; Gary
Oldman; Batman Begins; Two Face; Gotham City; Maggie Gyllenhaal;
Rachel Dawes; Michael Caine; special effect; Tim Burton; Jack
Nicholson; dark knight텍스트 분석 기초 복습을 하다보면 예전에 올렸던 웹스크래핑과 연관되어서 무엇인가를 할 수 있겠다는 생각이 듭니다.
지금은 파일로 정리된 리뷰를 가져와서 간단한 텍스트 데이터 분석을 하고있지만 이제 실제로 이 리뷰 데이터를 가져오기 위해서는 웹 스크래핑이 필요하겠죠.
그리고 이 스크래핑도 직접 일일이 손으로 하는게 아니라 셀레니움을 이용해서 자동으로 할 수도 있겠구요.
아직은 많이 초짜지만 언젠간 이 모든 작업들을 다 동시에 다 해보는 활동을 하고 티스토리에 올려보는 시간을 가져 볼 수 있기를 기대하며 오늘은 여기서 마무리 하겠습니다.
감사합니다.
'프로그래밍 > 웹크롤링 & 텍스트 데이터 분석' 카테고리의 다른 글
| 파이썬을 이용한 네이버 뉴스 스크래핑 (1) (0) | 2023.02.05 |
|---|---|
| 텍스트 데이터 분석 기초 복습 4 (Text Analysis) (0) | 2023.01.27 |
| 텍스트 데이터 분석 기초 복습 2 (TF-IDF, Cosine Similarity, 정규표현식) (0) | 2023.01.25 |
| 텍스트 데이터 분석 기초 복습 1 (Preprocessing Text Data) (0) | 2023.01.24 |
| 파이썬 웹크롤링 기초 복습 (2) (0) | 2023.01.12 |


